Monday, December 10, 2012


This is my bonus project for my company! I found a cardboard box from a friend and put the earring box inside. I took extra pattern and cut, placed, and pasted it on the inside of the box. The earrings are actually mine that my mother gave me. Next I printed the pattern document on two sheets of tracing paper to act as tissue paper for my package.

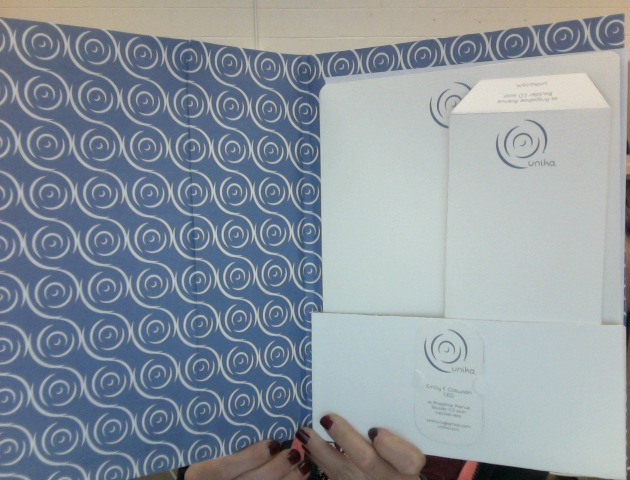
Originally I was going to add the ribbon I had bought earlier for this idea and put the logo on top of the small jewelry box with said ribbon but when I explain the idea to many classmates they felt that it was logo overload and to leave it subtle like this. I felt that their suggestion was valid so I left the tissue paper and inside of the jewelry box speak for the company instead of hitting the consumer over the head with the logo.

Final print

This is the cover of my new folder. It took multiple tries to get the cutout to work. The blue is a ban of watercolor paper that i printed on both sides of.
The entire folder is made up of white watercolor paper attached to poster board attached to printed on watercolor paper. The flap is the same composition. The pattern that is throughout my piece is my logo inverted and repeated.

All of the documents now have the pattern seen on the inside of the folder on their backs, and for the envelope on the inside. These are the documents that had text changes to them, the mailing label and the business card. I enlarged the name on the business card to draw emphasis to it. The mailing label had copy taken from it with the exception of the company name and street address. The customers address was added to this mailing label. The copy of the letterheads did not change.

Final Wireframes/tablet aspect

 The changes I made to my wireframe since my last post includes the addition of the social media buttons under the search bar. I found photos of them online and recreated them in illustrator, put the logos blue into them all and placed them into my design. To all of the buttons I added a cursor to show where to click. I also added a shopping cart button using the same steps as the media buttons.  I have included pictures of all stage changes in my design. I removed the dashes in all of my lists because I was told they were unnecessary.
 Finally, the major addition was the quickview menu I added to the Inspired? Go Design! button. It includes pictures that a person could click on for each step of the process. The arrows show that their could be more inventory a customer could look through. The menu mimics the smaller menu above in color scheme.


Saturday, December 8, 2012

Wireframes in progress 2


 After the two critiques I received in class from my classmates I changed a few things on my wireframes. This includes the footer, I got rid of the contact us line of text, changed the format and added terms & conditions and the private policy. The buttons seems very flat so I added a light gradient to the top toolbar, the side bar on the catalog page and to the Go Design button. I also, by suggestion, made that button larger since that is the focus of my site/brand.  I was told my up and down state were too similar, so to the left is the change I made. The gradient changes to the logo's blue to a darker gray and the text is white when a button is clicked. This applies to the Look Around button, Go Design Button and the Design! button. I changed the drop down menu for that button also. I added a gradient to it, made it a darker gray. I also changed the menu or the side bar and drop down menu's text to the same typeface as the catalog to increase readability.

I am going to add quick view type of menus to the Go Design! button and the side bar to show an example of the actual design process.


Tuesday, December 4, 2012

Wireframes in progress

 This is what my wireframes look like in progress. Since the last post I have added the Contact us bar to the bottom of both pages and added the second have of content to the home page, which explains how designing everything works. I also added the content to the drop down Design! menu. I added the final catalog photo and typed up the descriptions.


< This photo displays the Design! drop down menu.


Below shows what the links on the Design By menu would look like if you clicked on it.

Monday, December 3, 2012

Wireframes


 These are the wireframes I had for class today. I started adding the actual text to sections like the tool bar. Overall my layout is very simple to create an atmosphere where the costumers feel comfortable and not overwhelmed when designing their earrings.
 I have started adding in more text and images including my brand's logo, a main image on the home page, and almost all of my catalog images.
This is what the Look Around button looks like when rolled over or clicked.
This is what the Design! button looks like when rolled over or clicked. It brings up a menu of choices.


I am trying to stick within the color scheme of blues and greys for the overall feel of my website.


This are my original sketches for my home and catalog pages. I used the templates given to us to figure out generally where i was going to put everything

All printed Stationary pieces

These are the scans of all of my stationary pieces I had for the last critique before finals. The folder, which had the logo cutout so the blue would show through and on the inside was a rounded pocket with a place to put the business card. I constructed this folder using the given template. The blue sheet within the actual paper is watercolor with the blue of my logo printed on both sides. Below is everything that was inside it, the stationary with and without copy, the envelope, business card, and shipping label. I tired to stay with an overall vertical design for most of my pieces, including my envelope. On the backs of all of the printed pieces is the blue of the logo. I scanned in the backs of the envelope and business card to show this.

After the critique I decided to add the pattern of the logo to the inside of the folder and to the back of all of my documents. I am also currently redesigning the folder so the cutout does not have to be done on the thicker of the papers.


Tuesday, November 27, 2012

In progress stationary pieces

 These are my stationary pieces that I brought for the in progress. The top picture has the multiple versions of business cards and the middle picture is also a business card possibility. The circle item in the top picture morphed from a business card into a shipping label. I felt that the shape worked much better with the idea of a shipping label and there was plenty of room for the information. For my overall design I wanted to keep with the cool tones of my logo. For the first group I wanted to work with the ideas of rounded edges since that's all the logo itself is. I included all the needed information and I thought to add the tag line, "splash of class" to help the consumer to understand what the logo represents. Also, since the earrings are small and classy the tagline represents the earrings themselves.


In the lower design and the stationary that goes with it I wanted to bring focus to the logo and have a different shaped business card to highlight the unique-ness. The stationary would also be cut out like the business card. Overall the feedback with this design was that the logo could rip off or be accidentally bent down. I was given the suggestion to incorporate the blue of the logo where I would have cut out, but I think overall the design would just become top heavy which is not the feel I am going for. I am going to push the roundness of the edges idea further and incorporate all of the stationary under that idea so it is uniform.

Monday, November 19, 2012

Logo Black and White and Color

 This is the logo that everyone agreed worked the best visually. Since the in progress I have moved the TM of the symbol and create all of them in the correct sizes as specified in the project paper. Also, I have added of colors I was planning to use, the blue for the water and a light grey to balance out the design.

Logotype in progress

 Of my fifty logotypes I chose these three to be critiqued. They all come from the idea of the unique water ripple and the tag line, splash of clash.

< This one is using the typeface Fabada and the entire original symbol.


< This logotype is using Lane- Narrow and the ripple is forming from the typeface out.

< This is a combination of the above two using the Fabada typeface and half of the ripple.

50 symbols/logotypes

These are the 50 logo/logotypes I developed off of two of my symbols from the original hundred. The idea of unique zebra stripes representing each unique pair of earrings and a ripple of water developed from the idea of the tagline, a splash of class and also the fact that ripples are also unique.

< I started with refining my mark for the first ten and coming up which possible variations. For example with different placement of line and weight of line.

< Next I moved onto illustrator where I combine the logos with typefaces I had chosen based on the criteria I gave myself which included a sans-serif that worked well in all caps. From there I continued to play with the orientation of the symbol and word and I played with the line weight.


< As for the name of my company I wanted to highlight the fact that each set of jewelry would be unique so I looked into how different languages said unique:
unik- Danish
unika- Swedish
kipekee- Swahili 
I chose unika to allow someone who doesn't speak the language to be able to guess that it means unique. I found that the version with the a reads more as a feminine company.

Mission Statement

This is our revised mission statement for our customizable online earring company:

“to launch a unique experience that allows anyone to design their own earring creations that exclusively use fair trade metals”

We changed the first verb to launch to better represent our online presence. We also added that we exclusively use fair trade metals to our mission statement.

Wednesday, November 14, 2012

Branding logos part 2

These are the second series of logos I created for class on 11/14. I pursued the animal direction further and thought of more things that are unique in nature. On the page to the left there are tigers, zebras and snowflakes because their stripes or entire selves are unique. After this in the above page I try to create logos that are less representational and more abstract. I came to this abstract stripe idea that began to look like fingerprints, which I then realized is also unique. I plan on pursuing that further and possibly taking my own fingerprints and vectorizing them.


Monday, November 12, 2012

Branding Project ideation


 These are my first 50 logos for the branding project. First is the two icon sheets, then  the next two are screen shots from my sketchbook of my mind map and larger drawings that I scaled down. The final picture is a screenshot of my naming worksheet.
Overall I played with internet/ online symbols and jewelry symbols like gems. Next I brainstormed different animals that are elegant or unique that could relate to my company.
For my next set of symbols I am going to look into other unique things and possibly a stamp design.